
Middle Game Strategy (Part 1)
11.02.2024 05:22 | TrainingThe topic of this article is a trivial question: How do we determine if a piece is well (or poorly) placed?
One answer even a beginner might think of: A piece is well-placed when it is active, controls many squares, attacks a vulnerable spot, in short, when it performs useful work. Let's call this the active value of a piece. The second answer is equally important but much more subtle: A piece not only performs work but also has a certain value. If your opponent captures your bishop, you have one less bishop. A vulnerable piece thus ties up other pieces that must defend it, thereby reducing the combat effectiveness of the entire army. Further, a piece is not only an active weapon but in a sense also a "lump of wood"; poorly positioned, it can stand in the way of its comrades, it can obstruct. Let's call these two factors together the passive value of a piece.
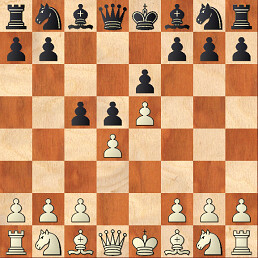
A simple example: while in the French Defense on the first diagram the light-squared bishop of Black is safe but inactive; in the position on diagram No. 2, which arises from the Caro-Kann, it plays but stands exposed.
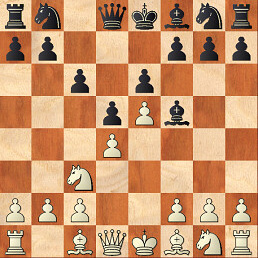
In both cases, the light-squared bishop is "bad," i.e., not harmonized with the pawn structure. In the French, however, its active value suffers, while in the Caro-Kann, its passive value. This difference significantly influences White's strategy: while in the French Defense it is possible to play slowly, hoping that the passivity of the bishop somewhere on d7 will show later, maybe even in the endgame, in the Caro-Kann White is often much more aggressive, and the resulting middlegame is usually much sharper than in the French. (In the position on the diagram, White often plays 5.g4 followed by h4 and an unabashed attempt to simply take the bishop.)
Even an average chess player can relatively reliably determine the "active value" of a piece – if, for instance, a knight can only go to two squares, it probably isn't well-placed. Determining the "passive value" of the same piece is much harder because it requires perceiving the context of the entire chessboard. Correctly evaluating the "passive value" of a piece is the basis of a feeling for the interaction of pieces, which is perhaps the most important component of a chess player's strength. Thus, there is a direct proportion: the more thoroughly a chess player learns to view their pieces, so to speak, "from both sides," the greater their playing strength will be.
.jpg)
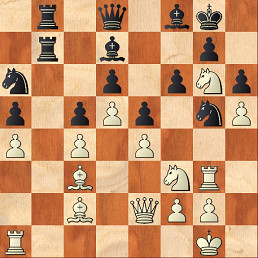
Now let's look at three examples: The first (see diagram No.3) is from a fashionable variation of the Russian Defense: Black (on move) certainly does not have less active pieces than White. The queen on d5 controls many squares, the knight is developed to the center, nor do the bishops have anything to complain about. And yet White can successfully hope for an advantage. The problem of the Black army lies in the vulnerability of his pieces: Qd5 will be kicked by the pawn c3, Nc6 covers the bishop and an important square e5 but can itself be attacked by pd4. Se7 is unsupported, Sf5, and pawns b7 or c7 are possible attack targets. As far as the "passive value" of pieces is concerned, Black is in a much worse position than White. Karpov and Portisch (Lucerne 82) exploited this difference perfectly, creating the following miniature: 14...Bg6 [Today mainly 14...Rfe8 is played] 15.c4 Qd7 16.d5 Bf6 17.Ra2 Na5 18.Bf4 Rfe8 19.Rae2 Rec8 20.Ne5 Qf5 21.Bd2 Nxc4 22.g4 Nxe5 23.gxf5 Nf3+ 24.Kg2 Bh5 25.Qa4 Nxh4+ 26.Kh3 Bxe2 27.Bxe2 1–0
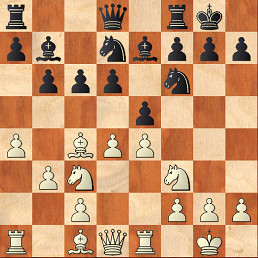
Another example (see diagram No.4) from the practice of the world's lowest master: Karpov-Andersson, Stockholm 69. Ulf Andersson played 31...Nb4 in this position. Karpov writes about this move: "Nonsense, Black should have rather sacrificed the quality on b4." The problem with the knight's jump is not that it stands poorly on b4; quite the contrary. It's more about it acting as a cork, obstructing the doubled rooks.
And thirdly, diagram No.5 from the main line of the Philidor Defense: White (let's specifically follow the game Ganguly - Ciufentes Parada, Mallorca 2004) at this point (or a move later after developing the bishop to b2) plays the seemingly mysterious move 10.Bd3. Why? A chess player who does not perceive the "passive value" of pieces will probably not be able to decode this move. The bishop on c4 stands "more active" than on d3. Such a chess player would play Bb2, Qd2, and Rad1; then ponder for a long time and wonder why they cannot find any active path to advantage, even though their pieces stand "ideally."
Yet, the retreat of the bishop has strong internal logic: on c4, the bishop is vulnerable, and sooner or later it will be attacked by ..b5 or ..d5. The bishop's retreat complicates these Black activities. The knight on c3 will follow it immediately (b6-b5-b4). Moreover, both pieces stand in the way of the c-pawn, the knight also screens the dark-squared bishop, which will soon stand on b2. White, therefore, plans to move the knight to g3. However, to do this, he needs to cover e4; hence he retreats the bishops to d3, not to f1. The game continued: 10.Bd3 Re8 11.Bb2 a6 12.Ne2 Bf8 13.Ng3 Qc7 14.c4. White harmonized his light pieces, threatens to gain space with the move d5. He has a slight advantage.
Perceiving the "passive value" of pieces allows us to explain why the queen is a poor defender, why there is a certain usual order of development (knights-bishops-castling-heavy pieces), why fianchetto is better in certain types of positions than ordinary development of the bishop, even at the cost of a tempo, and many other partial phenomena of chess strategy. The reader will probably come up with further examples on their own.
* for nss.cz Ján Markoš